Table of Contents
It is said that “a day that is without troubles is not fulfilling. Rather, give me a day of troubles well handled so that I can be content with my achievements.”
In the world of computer networks, problems are as varied as the people who create them or experience them. The design of the network implemented in “The 500-User Office” may create problems for some network users. The following lists some of the problems that may occur:
Caution
A significant number of network administrators have responded to the guidance given here. It should be noted that there are sites that have a single PDC for many hundreds of concurrent network clients. Network bandwidth, network bandwidth utilization, and server load are among the factors that determine the maximum number of Windows clients that can be served by a single domain controller (PDC or BDC) on a network segment. It is possible to operate with only a single PDC over a routed network. What is possible is not necessarily best practice. When Windows client network logons begin to fail with the message that the domain controller cannot be found or that the user account cannot be found (when you know it exists), that may be an indication that the domain controller is overloaded or network bandwidth is overloaded. The guidance given for PDC/BDC ratio to Windows clients is conservative and if followed will minimize problems but it is not absolute.
- Users experiencing difficulty logging onto the network
When a Windows client logs onto the network, many data packets are exchanged between the client and the server that is providing the network logon services. Each request between the client and the server must complete within a specific time limit. This is one of the primary factors that govern the installation of multiple domain controllers (usually called secondary or backup controllers). As a rough rule, there should be one such backup controller for every 30 to 150 clients. The actual limits are determined by network operational characteristics.
If the domain controller provides only network logon services and all file and print activity is handled by domain member servers, one domain controller per 150 clients on a single network segment may suffice. In any case, it is highly recommended to have a minimum of one domain controller (PDC or BDC) per network segment. It is better to have at least one BDC on the network segment that has a PDC. If the domain controller is also used as a file and print server, the number of clients it can service reliably is reduced, and generally for low powered hardware should not exceed 30 machines (Windows workstations plus domain member servers) per domain controller. Many sites are able to operate with more clients per domain controller, the number of clients that can be supported is limited by the CPU speed, memory and the workload on the Samba server as well as network bandwidth utilization.
- Slow logons and log-offs
Slow logons and log-offs may be caused by many factors that include:
Excessive delays in the resolution of a NetBIOS name to its IP address. This may be observed when an overloaded domain controller is also the WINS server. Another cause may be the failure to use a WINS server (this assumes that there is a single network segment).
Network traffic collisions due to overloading of the network segment. One short-term workaround to this may be to replace network HUBs with Ethernet switches.
Defective networking hardware. Over the past few years, we have seen on the Samba mailing list a significant increase in the number of problems that were traced to a defective network interface controller, a defective HUB or Ethernet switch, or defective cabling. In most cases, it was the erratic nature of the problem that ultimately pointed to the cause of the problem.
Excessively large roaming profiles. This type of problem is typically the result of poor user education as well as poor network management. It can be avoided by users not storing huge quantities of email in MS Outlook PST files as well as by not storing files on the desktop. These are old bad habits that require much discipline and vigilance on the part of network management.
You should verify that the Windows XP WebClient service is not running. The use of the WebClient service has been implicated in many Windows networking-related problems.
- Loss of access to network drives and printer resources
Loss of access to network resources during client operation may be caused by a number of factors, including:
No matter what the cause, a sudden loss of access to network resources can result in BSOD (blue screen of death) situations that necessitate rebooting of the client workstation. In the case of a mild problem, retrying to access the network drive of the printer may restore operations, but in any case this is a serious problem that may lead to the next problem, data corruption.
- Potential data corruption
Data corruption is one of the most serious problems. It leads to uncertainty, anger, and frustration, and generally precipitates immediate corrective demands. Management response to this type of problem may be rational, as well as highly irrational. There have been cases where management has fired network staff for permitting this situation to occur without immediate correction. There have been situations where perfectly functional hardware was thrown out and replaced, only to find the problem caused by a low-cost network hardware item. There have been cases where server operating systems were replaced, or where Samba was updated, only to later isolate the problem due to defective client software.
In this chapter, you can work through a number of measures that significantly arm you to anticipate and combat network performance issues. You can work through complex and thorny methods to improve the reliability of your network environment, but be warned that all such steps demand the price of complexity.
Computer (machine) accounts can be placed wherever you like in an LDAP directory subject to some constraints that are described in this section.
The POSIX and SambaSAMAccount components of computer (machine) accounts are both used by Samba. That is, machine accounts are treated inside Samba in the same way that Windows NT4/200X treats them. A user account and a machine account are indistinguishable from each other, except that the machine account ends in a $ character, as do trust accounts.
The need for Windows user, group, machine, trust, and other such accounts to be tied to a valid UNIX UID is a design decision that was made a long way back in the history of Samba development. It is unlikely that this decision will be reversed or changed during the remaining life of the Samba-3.x series.
The resolution of a UID from the Windows SID is achieved within Samba through a mechanism that must refer back to the host operating system on which Samba is running. The name service switch (NSS) is the preferred mechanism that shields applications (like Samba) from the need to know everything about every host OS it runs on.
Samba asks the host OS to provide a UID via the “passwd”, “shadow” and “group” facilities in the NSS control (configuration) file. The best tool for achieving this is left up to the UNIX administrator to determine. It is not imposed by Samba. Samba provides winbindd together with its support libraries as one method. It is possible to do this via LDAP, and for that Samba provides the appropriate hooks so that all account entities can be located in an LDAP directory.
For many the weapon of choice is to use the PADL nss_ldap utility. This utility must be configured so that computer accounts can be resolved to a POSIX/UNIX account UID. That is fundamentally an LDAP design question. The information provided on the Samba list and in the documentation is directed at providing working examples only. The design of an LDAP directory is a complex subject that is beyond the scope of this documentation.
You just opened an email from Christine that reads:
Good morning,
A few months ago we sat down to design the network. We discussed the challenges ahead and we all agreed to compromise our design to keep it simple. We knew there would be problems, but anticipated that we would have some time to resolve any issues that might be encountered. As you now know, we started off on the wrong foot. We have a lot of unhappy users. One of them resigned yesterday afternoon because she was under duress to complete some critical projects. She suffered a blue screen of death situation just as she was finishing four hours of intensive work, all of which was lost. She has a unique requirement that involves storing large files on her desktop. Mary's desktop profile is nearly 1 GB in size. As a result of her desktop configuration, it takes her nearly 15 minutes just to log onto her workstation. But that is not enough. Because all network logon traffic passes over the network links between our buildings, logging on may take three or four attempts due to blue screen problems associated with network timeouts. A few of us worked to help her out of trouble. We convinced her to stay and promised to fully resolve the difficulties she is facing. We have no choice. We must implement LDAP and set hard limits on what our users can do with their desktops. Otherwise, we face staff losses that can surely do harm to our growth as well as to staff morale. I am sure we can better deal with the consequences of what we know we must do than we can with the unrest we have now. Stan and I have discussed the current situation. We are resolved to help our users and protect the well being of Abmas. Please acknowledge this advice with consent to proceed as required to regain control of our vital IT operations. | ||
| --Christine | ||
Every compromise has consequences. Having a large routed (i.e., multisegment) network with only a single domain controller is a poor design that has obvious operational effects that may frustrate users. Here is your reply:
Christine, Your diligence and attention to detail are much valued. Stan and I fully support your proposals to resolve the issues. I am confident that your plans fully realized will significantly boost staff morale. Please go ahead with your plans. If you have any problems, please let me know. Please let Stan know what the estimated cost will be so I can approve the expense. Do not wait for approval; I appreciate the urgency. | ||
| --Bob | ||
The priority of assigned tasks in this chapter is:
Implement Backup Domain Controllers (BDCs) in each building. This involves a change from a tdbsam backend that was used in the previous chapter to an LDAP-based backend.
You can implement a single central LDAP server for this purpose.
Rectify the problem of excessive logon times. This involves redirection of folders to network shares as well as modification of all user desktops to exclude the redirected folders from being loaded at login time. You can also create a new default profile that can be used for all new users.
You configure a new MS Windows XP Professional workstation disk image that you roll out to all desktop users. The instructions you have created are followed on a staging machine from which all changes can be carefully tested before inflicting them on your network users.
This is the last network example in which specific mention of printing is made. The example again makes use of the CUPS printing system.
The implementation of Samba BDCs necessitates the installation and configuration of LDAP. For this site, you use OpenLDAP, the open source software LDAP server platform. Commercial LDAP servers in current use with Samba-3 include:
Novell eDirectory is being successfully used by some sites. Information on how to use eDirectory can be obtained from the Samba mailing lists or from Novell.
IBM Tivoli Directory Server can be used to provide the Samba LDAP backend. Example schema files are provided in the Samba source code tarball under the directory
~samba/example/LDAP.Sun ONE Identity Server product suite provides an LDAP server that can be used for Samba. Example schema files are provided in the Samba source code tarball under the directory
~samba/example/LDAP.
A word of caution is fully in order. OpenLDAP is purely an LDAP server, and unlike commercial offerings, it requires that you manually edit the server configuration files and manually initialize the LDAP directory database. OpenLDAP itself has only command-line tools to help you to get OpenLDAP and Samba-3 running as required, albeit with some learning curve challenges.
For most sites, the deployment of Microsoft Active Directory from the shrink-wrapped installation is quite adequate. If you are migrating from Microsoft Active Directory, be warned that OpenLDAP does not include GUI-based directory management tools. Even a simple task such as adding users to the OpenLDAP database requires an understanding of what you are doing, why you are doing it, and the tools that you must use.
When installed and configured, an OpenLDAP Identity Management backend for Samba functions well. High availability operation may be obtained through directory replication/synchronization and master/slave server configurations. OpenLDAP is a mature platform to host the organizational directory infrastructure that can include all UNIX accounts, directories for electronic mail, and much more. The price paid through learning how to design an LDAP directory schema in implementation and configuration of management tools is well rewarded by performance and flexibility and the freedom to manage directory contents with greater ability to back up, restore, and modify the directory than is generally possible with Microsoft Active Directory.
A comparison of OpenLDAP with Microsoft Active Directory does not do justice to either. OpenLDAP is an LDAP directory tool-set. Microsoft Active Directory Server is an implementation of an LDAP server that is largely preconfigured for a specific task orientation. It comes with a set of administrative tools that is entirely customized for the purpose of running MS Windows applications that include file and print services, Microsoft Exchange server, Microsoft SQL server, and more. The complexity of OpenLDAP is highly valued by the UNIX administrator who wants to build a custom directory solution. Microsoft provides an application called MS ADAM that provides more generic LDAP services, yet it does not have the vanilla-like services of OpenLDAP.
You may wish to consider outsourcing the development of your OpenLDAP directory to an expert, particularly if you find the challenge of learning about LDAP directories, schemas, configuration, and management tools and the creation of shell and Perl scripts a bit challenging. OpenLDAP can be easily customized, though it includes many ready-to-use schemas. Samba-3 provides an OpenLDAP schema file that is required for use as a passdb backend.
For those who are willing to brave the process of installing and configuring LDAP and Samba-3 interoperability, there are a few nice Web-based tools that may help you to manage your users and groups more effectively. The Web-based tools you might like to consider include the LDAP Account Manager (LAM) and the Webmin-based Webmin Idealx CGI tools.
Some additional LDAP tools should be mentioned. Every so often a Samba user reports using one of these, so it may be useful to them: GQ, a GTK-based LDAP browser; LDAP Browser/Editor ; JXplorer (by Computer Associates); and phpLDAPadmin.
Note
The following prescriptive guidance is not an LDAP tutorial. The LDAP implementation expressly uses minimal security controls. No form of secure LDAP communications is attempted. The LDAP configuration information provided is considered to consist of the barest essentials only. You are strongly encouraged to learn more about LDAP before attempting to deploy it in a business-critical environment.
Information to help you get started with OpenLDAP is available from the OpenLDAP web site. Many people have found the book LDAP System Administration, by Jerry Carter quite useful.
Mary's problems are due to two factors. First, the absence of a domain controller on the local network is the main cause of the errors that result in blue screen crashes. Second, Mary has a large profile that must be loaded over the WAN connection. The addition of BDCs on each network segment significantly improves overall network performance for most users, but it is not enough. You must gain control over user desktops, and this must be done in a way that wins their support and does not cause further loss of staff morale. The following procedures solve this problem.
There is also an opportunity to implement smart printing features. You add this to the Samba configuration so that future printer changes can be managed without need to change desktop configurations.
You add the ability to automatically download new printer drivers, even if they are not installed in the default desktop profile. Only one example of printing configuration is given. It is assumed that you can extrapolate the principles and use them to install all printers that may be needed.
The solution provided is a minimal approach to getting OpenLDAP running as an identity management directory server for UNIX system accounts as well as for Samba. From the OpenLDAP perspective, UNIX system accounts are stored POSIX schema extensions. Samba provides its own schema to permit storage of account attributes Samba needs. Samba-3 can use the LDAP backend to store:
Windows Networking User Accounts
Windows NT Group Accounts
Mapping Information between UNIX Groups and Windows NT Groups
ID Mappings for SIDs to UIDs (also for foreign Domain SIDs)
The use of LDAP with Samba-3 makes it necessary to store UNIX accounts as well as Windows Networking
accounts in the LDAP backend. This implies the need to use the
PADL LDAP tools. The resolution
of the UNIX group name to its GID must be enabled from either the /etc/group
or from the LDAP backend. This requires the use of the PADL nss_ldap tool-set
that integrates with the NSS. The same requirements exist for resolution
of the UNIX username to the UID. The relationships are demonstrated in “The Interaction of LDAP, UNIX Posix Accounts and Samba Accounts”.

You configure OpenLDAP so that it is operational. Before deploying the OpenLDAP, you really ought to learn how to configure secure communications over LDAP so that site security is not at risk. This is not covered in the following guidance.
When OpenLDAP has been made operative, you configure the PDC called MASSIVE.
You initialize the Samba secrets.tdb file. Then you
create the LDAP Interchange Format (LDIF) file from which the LDAP database can be initialized.
You need to decide how best to create user and group accounts. A few hints are, of course, provided.
You can also find on the enclosed CD-ROM, in the Chap06 directory, a few tools
that help to manage user and group configuration.
In order to effect folder redirection and to add robustness to the implementation, create a network default profile. All network users workstations are configured to use the new profile. Roaming profiles will automatically be deleted from the workstation when the user logs off.
The profile is configured so that users cannot change the appearance of their desktop. This is known as a mandatory profile. You make certain that users are able to use their computers efficiently.
A network logon script is used to deliver flexible but consistent network drive connections.
Samba versions prior to 3.0.11 necessitated the use of a domain administrator account
that maps to the UNIX UID=0. The UNIX operating system permits only the root
user to add user and group accounts. Samba 3.0.11 introduced a new facility known as
Privileges, which provides five new privileges that
can be assigned to users and/or groups; see Table 5.1.
Table 5.1. Current Privilege Capabilities
| Privilege | Description |
|---|---|
SeMachineAccountPrivilege | Add machines to domain |
SePrintOperatorPrivilege | Manage printers |
SeAddUsersPrivilege | Add users and groups to the domain |
SeRemoteShutdownPrivilege | Force shutdown from a remote system |
SeDiskOperatorPrivilege | Manage disk share |
In this network example use is made of one of the supported privileges purely to demonstrate how any user can now be given the ability to add machines to the domain using a normal user account that has been given the appropriate privileges.
As XP roaming profiles grow, so does the amount of time it takes to log in and out.
An XP roaming profile consists of the HKEY_CURRENT_USER hive file
NTUSER.DAT and a number of folders (My Documents, Application Data,
Desktop, Start Menu, Templates, NetHood, Favorites, and so on). When a user logs onto the
network with the default configuration of MS Windows NT/200x/XPP, all this data is
copied to the local machine under the C:\Documents and Settings\%USERNAME%
directory. While the user is logged in, any changes made to any of these folders or to the
HKEY_CURRENT_USER branch of the registry are made to the local copy
of the profile. At logout the profile data is copied back to the server. This behavior
can be changed through appropriate registry changes and/or through changes to the default
user profile. In the latter case, it updates the registry with the values that are set in the
profile NTUSER.DAT
file.
The first challenge is to reduce the amount of data that must be transferred to and
from the profile server as roaming profiles are processed. This includes removing
all the shortcuts in the Recent directory, making sure the cache used by the Web browser
is not being dumped into the Application Data folder, removing the
Java plug-ins cache (the .jpi_cache directory in the profile), as well as training the
user to not place large files on the desktop and to use his or her mapped home directory
instead of the My Documents folder for saving documents.
Using a folder other than My Documents is a nuisance for
some users, since many applications use it by default.
The secret to rapid loading of roaming profiles is to prevent unnecessary data from
being copied back and forth, without losing any functionality. This is not difficult;
it can be done by making changes to the Local Group Policy on each client as well
as changing some paths in each user's NTUSER.DAT hive.
Every user profile has its own NTUSER.DAT file. This means
you need to edit every user's profile, unless a better method can be
followed. Fortunately, with the right preparations, this is not difficult.
It is possible to remove the NTUSER.DAT file from each
user's profile. Then just create a Network Default Profile. Of course, it is
necessary to copy all files from redirected folders to the network share to which
they are redirected.
Without an Active Directory PDC, you cannot take full advantage of Group Policy
Objects. However, you can still make changes to the Local Group Policy by using
the Group Policy editor (gpedit.msc).
The Exclude directories in roaming profile settings can be found under → → → . By default this setting contains “Local Settings; Temporary Internet Files; History; Temp”.
Simply add the folders you do not wish to be copied back and forth to this semicolon-separated list. Note that this change must be made on all clients that are using roaming profiles.
There are two changes that should be done to each user's profile. Move each of
the directories that you have excluded from being copied back and forth out of
the usual profile path. Modify each user's NTUSER.DAT file
to point to the new paths that are shared over the network instead of to the default
path (C:\Documents and Settings\%USERNAME%).
The above modifies existing user profiles. So that newly created profiles have
these settings, you need to modify the NTUSER.DAT in
the C:\Documents and Settings\Default User folder on each
client machine, changing the same registry keys. You could do this by copying
NTUSER.DAT to a Linux box and using regedt32.
The basic method is described under “Configuration of Default Profile with Folder Redirection”.
If you are using Samba as your PDC, you should create a file share called
NETLOGON and within that create a directory called
Default User, which is a copy of the desired default user
configuration (including a copy of NTUSER.DAT).
If this share exists and the Default User folder exists,
the first login from a new account pulls its configuration from it.
See also
the Real Men Don't Click Web site.
The subject of printing is quite topical. Printing problems run second place to name
resolution issues today. So far in this book, you have experienced only what is generally
known as “dumb” printing. Dumb printing is the arrangement by which all drivers
are manually installed on each client and the printing subsystems perform no filtering
or intelligent processing. Dumb printing is easily understood. It usually works without
many problems, but it has its limitations also. Dumb printing is better known as
Raw-Print-Through printing.
Samba permits the configuration of smart printing using the Microsoft
Windows point-and-click (also called drag-and-drop) printing. What this provides is
essentially the ability to print to any printer. If the local client does not yet have a
driver installed, the driver is automatically downloaded from the Samba server and
installed on the client. Drag-and-drop printing is neat; it means the user never needs
to fuss with driver installation, and that is a Good Thing,™
isn't it?
There is a further layer of print job processing that is known as intelligent
printing that automatically senses the file format of data submitted for printing and
then invokes a suitable print filter to convert the incoming data stream into a format
suited to the printer to which the job is dispatched.
The CUPS printing subsystem is capable of intelligent printing. It has the capacity to detect the data format and apply a print filter. This means that it is feasible to install on all Windows clients a single printer driver for use with all printers that are routed through CUPS. The most sensible driver to use is one for a PostScript printer. Fortunately, Easy Software Products, the authors of CUPS, have released a PostScript printing driver for Windows. It can be installed into the Samba printing backend so that it automatically downloads to the client when needed.
This means that so long as there is a CUPS driver for the printer, all printing from Windows software can use PostScript, no matter what the actual printer language for the physical device is. It also means that the administrator can swap out a printer with a totally different type of device without ever needing to change a client workstation driver.
This book is about Samba-3, so you can confine the printing style to just the smart style of installation. Those interested in further information regarding intelligent printing should review documentation on the Easy Software Products Web site.
It has often been said that there are three types of people in the world: those who have sharp minds and those who forget things. Please do not ask what the third group is like! Well, it seems that many of us have company in the second group. There must be a good explanation why so many network administrators fail to solve apparently simple problems efficiently and effectively.
Here are some diagnostic guidelines that can be referred to when things go wrong:
The best advice regarding how to mend a broken leg is “Never break a leg!”
Newcomers to Samba and LDAP seem to struggle a great deal at first. If you want advice regarding the best way to remedy LDAP and Samba problems: “Avoid them like the plague!”
If you are now asking yourself how problems can be avoided, the best advice is to start out your learning experience with a known-good configuration. After you have seen a fully working solution, a good way to learn is to make slow and progressive changes that cause things to break, then observe carefully how and why things ceased to work.
The examples in this chapter (also in the book as a whole) are known to work. That means that they could serve as the kick-off point for your journey through fields of knowledge. Use this resource carefully; we hope it serves you well.
Warning
Do not be lulled into thinking that you can easily adopt the examples in this book and adapt them without first working through the examples provided. A little thing overlooked can cause untold pain and may permanently tarnish your experience.
The name service caching daemon (nscd) is a primary cause of difficulties with name
resolution, particularly where winbind is used. Winbind does its
own caching, thus nscd causes double caching which can lead to peculiar problems during
debugging. As a rule, it is a good idea to turn off the name service caching daemon.
Operation of the name service caching daemon is controlled by the
/etc/nscd.conf file. Typical contents of this file are as follows:
# /etc/nscd.conf
# An example Name Service Cache config file.  This file is needed by nscd.
# Legal entries are:
#       logfile                 <file>
#       debug-level             <level>
#       threads                 <threads to use>
#       server-user             <user to run server as instead of root>
#               server-user is ignored if nscd is started with -S parameters
#       stat-user               <user who is allowed to request statistics>
#       reload-count            unlimited|<number>
#
#       enable-cache            <service> <yes|no>
#       positive-time-to-live   <service> <time in seconds>
#       negative-time-to-live   <service> <time in seconds>
#       suggested-size          <service> <prime number>
#       check-files             <service> <yes|no>
#       persistent              <service> <yes|no>
#       shared                  <service> <yes|no>
# Currently supported cache names (services): passwd, group, hosts
#       logfile                 /var/log/nscd.log
#       threads                 6
#       server-user             nobody
#       stat-user               somebody
        debug-level             0
#       reload-count            5
        enable-cache            passwd          yes
        positive-time-to-live   passwd          600
        negative-time-to-live   passwd          20
        suggested-size          passwd          211
        check-files             passwd          yes
        persistent              passwd          yes
        shared                  passwd          yes
        enable-cache            group           yes
        positive-time-to-live   group           3600
        negative-time-to-live   group           60
        suggested-size          group           211
        check-files             group           yes
        persistent              group           yes
        shared                  group           yes
# !!!!!WARNING!!!!! Host cache is insecure!!! The mechanism in nscd to
# cache hosts will cause your local system to not be able to trust
# forward/reverse lookup checks. DO NOT USE THIS if your system relies on
# this sort of security mechanism. Use a caching DNS server instead.
        enable-cache            hosts           no
        positive-time-to-live   hosts           3600
        negative-time-to-live   hosts           20
        suggested-size          hosts           211
        check-files             hosts           yes
        persistent              hosts           yes
        shared                  hosts           yes
It is feasible to comment out the passwd and group
entries so they will not be cached. Alternatively, it is often simpler to just disable the
nscd service by executing (on Novell SUSE Linux):
root#chkconfig nscd offroot#rcnscd off
In the example /etc/openldap/slapd.conf control file
(see “LDAP DB_CONFIG File”) there is an entry for loglevel 256.
To enable logging via the syslog infrastructure, it is necessary to uncomment this parameter
and restart slapd.
LDAP log information can be directed into a file that is separate from the normal system
log files by changing the /etc/syslog.conf file so it has the following
contents:
# Some foreign boot scripts require local7
#
local0,local1.*                 -/var/log/localmessages
local2,local3.*                 -/var/log/localmessages
local5.*                        -/var/log/localmessages
local6,local7.*                 -/var/log/localmessages
local4.*                        -/var/log/ldaplogs
In this case, all LDAP-related logs will be directed to the file
/var/log/ldaplogs. This makes it easy to track LDAP errors.
The snippet provides a simple example of usage that can be modified to suit
local site needs. The configuration used later in this chapter reflects such
customization with the intent that LDAP log files will be stored at a location
that meets local site needs and wishes more fully.
The basic mechanism for diagnosing problems with the nss_ldap utility involves adding to the
/etc/ldap.conf file the following parameters:
debug 256
logdir /data/logs
Create the log directory as follows:
root# mkdir /data/logs
The diagnostic process should follow these steps:
Procedure 5.1. NSS_LDAP Diagnostic Steps
Verify the
nss_base_passwd, nss_base_shadow, nss_base_groupentries in the/etc/ldap.conffile and compare them closely with the directory tree location that was chosen when the directory was first created.One way this can be done is by executing:
root#slapcat | grep Group | grep dn dn: ou=Groups,dc=abmas,dc=biz dn: cn=Domain Admins,ou=Groups,dc=abmas,dc=biz dn: cn=Domain Users,ou=Groups,dc=abmas,dc=biz dn: cn=Domain Guests,ou=Groups,dc=abmas,dc=biz dn: cn=Domain Computers,ou=Groups,dc=abmas,dc=biz dn: cn=Administrators,ou=Groups,dc=abmas,dc=biz dn: cn=Print Operators,ou=Groups,dc=abmas,dc=biz dn: cn=Backup Operators,ou=Groups,dc=abmas,dc=biz dn: cn=Replicators,ou=Groups,dc=abmas,dc=bizThe first line is the DIT entry point for the container for POSIX groups. The correct entry for the
/etc/ldap.conffor thenss_base_groupparameter therefore is the distinguished name (dn) as applied here:nss_base_group ou=Groups,dc=abmas,dc=biz?one
The same process may be followed to determine the appropriate dn for user accounts. If the container for computer accounts is not the same as that for users (see the
smb.conffile entry forldap machine suffix), it may be necessary to set the following DIT dn in the/etc/ldap.conffile:nss_base_passwd dc=abmas,dc=biz?sub
This instructs LDAP to search for machine as well as user entries from the top of the DIT down. This is inefficient, but at least should work. Note: It is possible to specify multiple
nss_base_passwdentries in the/etc/ldap.conffile; they will be evaluated sequentially. Let us consider an example of use where the following DIT has been implemented:User accounts are stored under the DIT: ou=Users, dc=abmas, dc=biz
User login accounts are under the DIT: ou=People, ou-Users, dc=abmas, dc=biz
Computer accounts are under the DIT: ou=Computers, ou=Users, dc=abmas, dc=biz
The appropriate multiple entry for the
nss_base_passwddirective in the/etc/ldap.conffile may be:nss_base_passwd ou=People,ou=Users,dc=abmas,dc=org?one nss_base_passwd ou=Computers,ou=Users,dc=abmas,dc=org?one
Perform lookups such as:
root#getent passwdEach such lookup will create an entry in the
/data/logdirectory for each such process executed. The contents of each file created in this directory may provide a hint as to the cause of the a problem that is under investigation.For additional diagnostic information, check the contents of the
/var/log/messagesto see what error messages are being generated as a result of the LDAP lookups. Here is an example of a successful lookup:slapd[12164]: conn=0 fd=10 ACCEPT from IP=127.0.0.1:33539 (IP=0.0.0.0:389) slapd[12164]: conn=0 op=0 BIND dn="" method=128 slapd[12164]: conn=0 op=0 RESULT tag=97 err=0 text= slapd[12164]: conn=0 op=1 SRCH base="" scope=0 deref=0 filter="(objectClass=*)" slapd[12164]: conn=0 op=1 SEARCH RESULT tag=101 err=0 nentries=1 text= slapd[12164]: conn=0 op=2 UNBIND slapd[12164]: conn=0 fd=10 closed slapd[12164]: conn=1 fd=10 ACCEPT from IP=127.0.0.1:33540 (IP=0.0.0.0:389) slapd[12164]: conn=1 op=0 BIND dn="cn=Manager,dc=abmas,dc=biz" method=128 slapd[12164]: conn=1 op=0 BIND dn="cn=Manager,dc=abmas,dc=biz" mech=SIMPLE ssf=0 slapd[12164]: conn=1 op=0 RESULT tag=97 err=0 text= slapd[12164]: conn=1 op=1 SRCH base="ou=People,dc=abmas,dc=biz" scope=1 deref=0 filter="(objectClass=posixAccount)" slapd[12164]: conn=1 op=1 SRCH attr=uid userPassword uidNumber gidNumber cn homeDirectory loginShell gecos description objectClass slapd[12164]: conn=1 op=1 SEARCH RESULT tag=101 err=0 nentries=2 text= slapd[12164]: conn=1 fd=10 closed
Check that the bindpw entry in the
/etc/ldap.confor in the/etc/ldap.secretsfile is correct, as specified in the/etc/openldap/slapd.conffile.
The following parameters in the smb.conf file can be useful in tracking down Samba-related problems:
[global]
	...
	log level = 5
	log file = /var/log/samba/%m.log
	max log size = 0
	...
This will result in the creation of a separate log file for every client from which connections are made. The log file will be quite verbose and will grow continually. Do not forget to change these lines to the following when debugging has been completed:
[global]
	...
	log level = 1
	log file = /var/log/samba/%m.log
	max log size = 50
	...
The log file can be analyzed by executing:
root#cd /var/log/sambaroot#grep -v "^\[200" machine_name.log
Search for hints of what may have failed by looking for the words fail and error.
MS Windows 2000 Professional and Windows XP Professional clients can be configured to create a netlogon.log file that can be very helpful in diagnosing network logon problems. Search the Microsoft knowledge base for detailed instructions. The techniques vary a little with each version of MS Windows.
MS Windows network users are generally very sensitive to limits that may be imposed when confronted with locked-down workstation configurations. The challenge you face must be promoted as a choice between reliable, fast network operation and a constant flux of problems that result in user irritation.
You are starting a complex project. Even though you went through the installation of a complex network in “The 500-User Office”, this network is a bigger challenge because of the large number of complex applications that must be configured before the first few steps can be validated. Take stock of what you are about to undertake, prepare yourself, and frequently review the steps ahead while making at least a mental note of what has already been completed. The following task list may help you to keep track of the task items that are covered:
Samba-3 PDC Server Configuration
DHCP and DNS servers
OpenLDAP server
PAM and NSS client tools
Samba-3 PDC
Idealx smbldap scripts
LDAP initialization
Create user and group accounts
Printers
Share point directory roots
Profile directories
Logon scripts
Configuration of user rights and privileges
Samba-3 BDC Server Configuration
DHCP and DNS servers
PAM and NSS client tools
Printers
Share point directory roots
Profiles directories
Windows XP Client Configuration
Default profile folder redirection
MS Outlook PST file relocation
Delete roaming profile on logout
Upload printer drivers to Samba servers
Install software
Creation of roll-out images
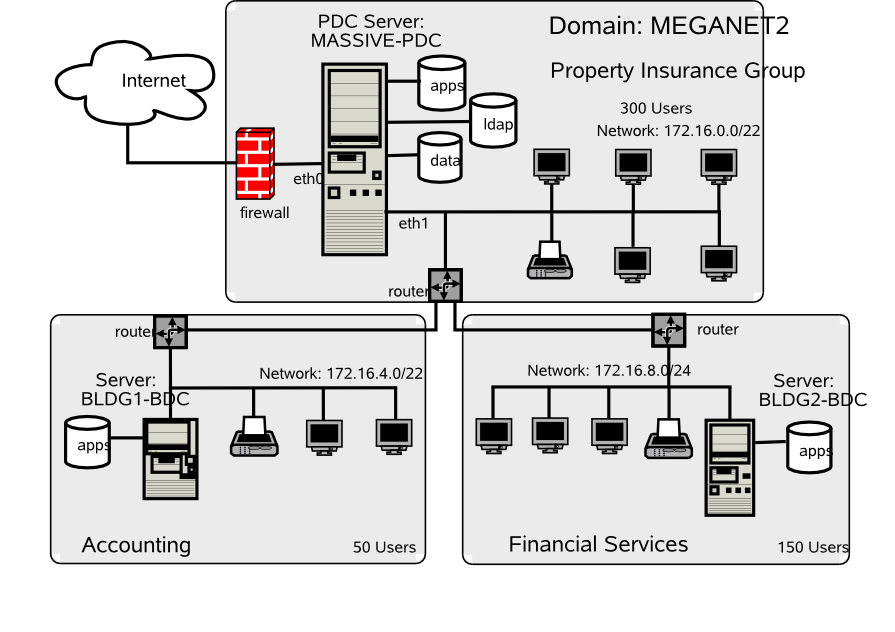
The network design shown in “Network Topology 500 User Network Using ldapsam passdb backend” is not comprehensive. It is assumed that you will install additional file servers and possibly additional BDCs.
All configuration files and locations are shown for SUSE Linux 9.2 and are equally valid for SUSE Linux Enterprise Server 9. The file locations for Red Hat Linux are similar. You may need to adjust the locations for your particular Linux system distribution/implementation.
Note
The following information applies to Samba-3.0.20 when used with the Idealx smbldap-tools
scripts version 0.9.1. If using a different version of Samba or of the smbldap-tools tarball,
please verify that the versions you are about to use are matching. The smbldap-tools package
uses counter-entries in the LDAP directory to avoid duplication of the UIDs and GIDs that are
issued for POSIX accounts. The LDAP rdn under which this information is stored are called
uidNumber and gidNumber respectively. These may be
located in any convenient part of the directory information tree (DIT). In the examples that
follow they have been located under dn=sambaDomainName=MEGANET2,dc=abmas,dc=org.
They could just as well be located under the rdn cn=NextFreeUnixId.
The steps in the process involve changes from the network configuration shown in “The 500-User Office”. Before implementing the following steps, you must have completed the network implementation shown in that chapter. If you are starting with newly installed Linux servers, you must complete the steps shown in “Installation of DHCP, DNS, and Samba Control Files” before commencing at “OpenLDAP Server Configuration”.
Confirm that the packages shown in “Required OpenLDAP Linux Packages” are installed on your system.
Table 5.2. Required OpenLDAP Linux Packages
| SUSE Linux 8.x | SUSE Linux 9.x | Red Hat Linux |
|---|---|---|
| nss_ldap | nss_ldap | nss_ldap |
| pam_ldap | pam_ldap | pam_ldap |
| openldap2 | openldap2 | openldap |
| openldap2-client | openldap2-client |
Samba-3 and OpenLDAP will have a degree of interdependence that is unavoidable. The method for bootstrapping the LDAP and Samba-3 configuration is relatively straightforward. If you follow these guidelines, the resulting system should work fine.
Procedure 5.2. OpenLDAP Server Configuration Steps
Install the file shown in “LDAP Master Configuration File /etc/openldap/slapd.conf Part A” in the directory
/etc/openldap.Remove all files from the directory
/data/ldap, making certain that the directory exists with permissions:root#ls -al /data | grep ldap drwx------ 2 ldap ldap 48 Dec 15 22:11 ldapThis may require you to add a user and a group account for LDAP if they do not exist.
Install the file shown in “LDAP DB_CONFIG File” in the directory
/data/ldap. In the event that this file is added afterldaphas been started, it is possible to cause the new settings to take effect by shutting down theLDAPserver, executing thedb_recovercommand inside the/data/ldapdirectory, and then restarting theLDAPserver.Performance logging can be enabled and should preferably be sent to a file on a file system that is large enough to handle significantly sized logs. To enable the logging at a verbose level to permit detailed analysis, uncomment the entry in the
/etc/openldap/slapd.confshown as “loglevel 256”.Edit the
/etc/syslog.conffile to add the following at the end of the file:local4.* -/data/ldap/log/openldap.log
Note: The path
/data/ldap/logshould be set at a location that is convenient and that can store a large volume of data.
Example 5.1. LDAP DB_CONFIG File
set_cachesize           0 150000000 1
set_lg_regionmax        262144
set_lg_bsize            2097152
#set_lg_dir             /var/log/bdb
set_flags               DB_LOG_AUTOREMOVE
Example 5.2. LDAP Master Configuration File /etc/openldap/slapd.conf Part A
include		/etc/openldap/schema/core.schema
include		/etc/openldap/schema/cosine.schema
include		/etc/openldap/schema/inetorgperson.schema
include		/etc/openldap/schema/nis.schema
include		/etc/openldap/schema/samba3.schema

pidfile		/var/run/slapd/slapd.pid
argsfile	/var/run/slapd/slapd.args

access to dn.base=""
		by self write
		by * auth

access to attr=userPassword
		by self write
		by * auth

access to attr=shadowLastChange
		by self write
		by * read

access to *
                by * read
                by anonymous auth

#loglevel	256

schemacheck 	on
idletimeout	30
backend		bdb
database	bdb
checkpoint      1024 5
cachesize       10000

suffix		"dc=abmas,dc=biz"
rootdn		"cn=Manager,dc=abmas,dc=biz"

# rootpw = not24get
rootpw          {SSHA}86kTavd9Dw3FAz6qzWTrCOKX/c0Qe+UV

directory	/data/ldap
Example 5.3. LDAP Master Configuration File /etc/openldap/slapd.conf Part B
# Indices to maintain
index objectClass           eq
index cn                    pres,sub,eq
index sn                    pres,sub,eq
index uid                   pres,sub,eq
index displayName           pres,sub,eq
index uidNumber             eq
index gidNumber             eq
index memberUID             eq
index sambaSID              eq
index sambaPrimaryGroupSID  eq
index sambaDomainName       eq
index default               sub
The steps that follow involve configuration of LDAP, NSS LDAP-based resolution of users and groups. Also, so that LDAP-based accounts can log onto the system, the steps ahead configure the Pluggable Authentication Modules (PAM) to permit LDAP-based authentication.
Since you have chosen to put UNIX user and group accounts into the LDAP database, it is likely
that you may want to use them for UNIX system (Linux) local machine logons. This necessitates
correct configuration of PAM. The pam_ldap open source package provides the
PAM modules that most people would use. On SUSE Linux systems, the pam_unix2.so
module also has the ability to redirect authentication requests through LDAP.
You have chosen to configure these services by directly editing the system files, but of course, you
know that this configuration can be done using system tools provided by the Linux system vendor.
SUSE Linux has a facility in YaST (the system admin tool) through → → that permits
configuration of SUSE Linux as an LDAP client. Red Hat Linux provides the authconfig
tool for this.
Procedure 5.3. PAM and NSS Client Configuration Steps
Example 5.4. Configuration File for NSS LDAP Support /etc/ldap.conf
host 127.0.0.1

base dc=abmas,dc=biz

binddn cn=Manager,dc=abmas,dc=biz
bindpw not24get

timelimit 50
bind_timelimit 50
bind_policy hard

idle_timelimit 3600

pam_password exop

nss_base_passwd ou=People,dc=abmas,dc=biz?one
nss_base_shadow ou=People,dc=abmas,dc=biz?one
nss_base_group  ou=Groups,dc=abmas,dc=biz?one

ssl off
Example 5.5. Configuration File for NSS LDAP Clients Support /etc/ldap.conf
host 172.16.0.1

base dc=abmas,dc=biz

binddn cn=Manager,dc=abmas,dc=biz
bindpw not24get

timelimit 50
bind_timelimit 50
bind_policy hard

idle_timelimit 3600

pam_password exop

nss_base_passwd ou=People,dc=abmas,dc=biz?one
nss_base_shadow ou=People,dc=abmas,dc=biz?one
nss_base_group  ou=Groups,dc=abmas,dc=biz?one

ssl off
Execute the following command to find where the
nss_ldapmodule expects to find its control file:root#strings /lib/libnss_ldap.so.2 | grep confThe preferred and usual location is
/etc/ldap.conf.On the server
MASSIVE, install the file shown in “Configuration File for NSS LDAP Support /etc/ldap.conf” into the path that was obtained from the step above. On the servers calledBLDG1andBLDG2, install the file shown in “Configuration File for NSS LDAP Clients Support /etc/ldap.conf” into the path that was obtained from the step above.Edit the NSS control file (
/etc/nsswitch.conf) so that the lines that control user and group resolution will obtain information from the normal system files as well as fromldap:passwd: files ldap shadow: files ldap group: files ldap hosts: files dns wins
Later, when the LDAP database has been initialized and user and group accounts have been added, you can validate resolution of the LDAP resolver process. The inclusion of WINS-based hostname resolution is deliberate so that all MS Windows client hostnames can be resolved to their IP addresses, whether or not they are DHCP clients.
Note
Some Linux systems (Novell SUSE Linux in particular) add entries to the
nsswitch.conffile that may cause operational problems with the configuration methods adopted in this book. It is advisable to comment out the entriespasswd_compatandgroup_compatwhere they are found in this file.Even at the risk of overstating the issue, incorrect and inappropriate configuration of the
nsswitch.conffile is a significant cause of operational problems with LDAP.For PAM LDAP configuration on this SUSE Linux 9.0 system, the simplest solution is to edit the following files in the
/etc/pam.ddirectory:login,password,samba,sshd. In each file, locate every entry that has thepam_unix2.soentry and add to the line the entryuse_ldapas shown for theloginmodule in this example:#%PAM-1.0 auth requisite pam_unix2.so nullok use_ldap #set_secrpc auth required pam_securetty.so auth required pam_nologin.so #auth required pam_homecheck.so auth required pam_env.so auth required pam_mail.so account required pam_unix2.so use_ldap password required pam_pwcheck.s nullok password required pam_unix2.so nullok use_first_pass \ use_authtok use_ldap session required pam_unix2.so none use_ldap # debug or trace session required pam_limits.soOn other Linux systems that do not have an LDAP-enabled
pam_unix2.somodule, you must edit these files by adding thepam_ldap.somodules as shown here:#%PAM-1.0 auth required pam_securetty.so auth required pam_nologin.so auth sufficient pam_ldap.so auth required pam_unix2.so nullok try_first_pass #set_secrpc account sufficient pam_ldap.so account required pam_unix2.so password required pam_pwcheck.so nullok password required pam_ldap.so use_first_pass use_authtok password required pam_unix2.so nullok use_first_pass use_authtok session required pam_unix2.so none # debug or trace session required pam_limits.so session required pam_env.so session optional pam_mail.so
This example does have the LDAP-enabled
pam_unix2.so, but simply demonstrates the use of thepam_ldap.somodule. You can use either implementation, but if thepam_unix2.soon your system supports LDAP, you probably want to use it rather than add an additional module.
Verify that the Samba-3.0.20 (or later) packages are installed on each SUSE Linux server before following the steps below. If Samba-3.0.20 (or later) is not installed, you have the choice to either build your own or obtain the packages from a dependable source. Packages for SUSE Linux 8.x, 9.x, and SUSE Linux Enterprise Server 9, as well as for Red Hat Fedora Core and Red Hat Enterprise Linux Server 3 and 4, are included on the CD-ROM that is included with this book.
Procedure 5.4. Configuration of PDC Called MASSIVE
Install the files in “LDAP Based smb.conf File, Server: MASSIVE global Section: Part A”, “LDAP Based smb.conf File, Server: MASSIVE global Section: Part B”, “LDAP Based smb.conf File, Shares Section Part A”, and “LDAP Based smb.conf File, Shares Section Part B” into the
/etc/samba/directory. The three files should be added together to form thesmb.confmaster file. It is a good practice to call this file something likesmb.conf.masterand then to perform all file edits on the master file. The operationalsmb.confis then generated as shown in the next step.Create and verify the contents of the
smb.conffile that is generated by:root#testparm -s smb.conf.master > smb.confImmediately follow this with the following:
root#testparmThe output that is created should be free from errors, as shown here:
Load smb config files from /etc/samba/smb.conf
Processing section "[accounts]"
Processing section "[service]"
Processing section "[pidata]"
Processing section "[homes]"
Processing section "[printers]"
Processing section "[apps]"
Processing section "[netlogon]"
Processing section "[profiles]"
Processing section "[profdata]"
Processing section "[print$]"
Loaded services file OK.
Server role: ROLE_DOMAIN_PDC
Press enter to see a dump of your service definitions
Delete all runtime files from prior Samba operation by executing (for SUSE Linux):
root#rm /etc/samba/*tdbroot#rm /var/lib/samba/*tdbroot#rm /var/lib/samba/*datroot#rm /var/log/samba/*Samba-3 communicates with the LDAP server. The password that it uses to authenticate to the LDAP server must be stored in the
secrets.tdbfile. Execute the following to create the newsecrets.tdbfiles and store the password for the LDAP Manager:root#smbpasswd -w not24getThe expected output from this command is:
Setting stored password for "cn=Manager,dc=abmas,dc=biz" in secrets.tdb
Samba-3 generates a Windows Security Identifier (SID) only when
smbdhas been started. For this reason, you start Samba. After a few seconds delay, execute:root#smbclient -L localhost -U%root#net getlocalsidA report such as the following means that the domain SID has not yet been written to the
secrets.tdbor to the LDAP backend:[2005/03/03 23:19:34, 0] lib/smbldap.c:smbldap_connect_system(852) failed to bind to server ldap://massive.abmas.biz with dn="cn=Manager,dc=abmas,dc=biz" Error: Can't contact LDAP server (unknown) [2005/03/03 23:19:48, 0] lib/smbldap.c:smbldap_search_suffix(1169) smbldap_search_suffix: Problem during the LDAP search: (unknown) (Timed out)The attempt to read the SID will cause and attempted bind to the LDAP server. Because the LDAP server is not running, this operation will fail by way of a timeout, as shown previously. This is normal output; do not worry about this error message. When the domain has been created and written to the
secrets.tdbfile, the output should look like this:SID for domain MASSIVE is: S-1-5-21-3504140859-1010554828-2431957765
If, after a short delay (a few seconds), the domain SID has still not been written to the
secrets.tdbfile, it is necessary to investigate what may be misconfigured. In this case, carefully check thesmb.conffile for typographical errors (the most common problem). The use of thetestparmis highly recommended to validate the contents of this file.When a positive domain SID has been reported, stop Samba.
Configure the NFS server for your Linux system. So you can complete the steps that follow, enter into the
/etc/exportsthe following entry:/home *(rw,root_squash,sync)
This permits the user home directories to be used on the BDC servers for testing purposes. You, of course, decide what is the best way for your site to distribute data drives, and you create suitable backup and restore procedures for Abmas I'd strongly recommend that for normal operation the BDC is completely independent of the PDC. rsync is a useful tool here, as it resembles the NT replication service quite closely. If you do use NFS, do not forget to start the NFS server as follows:
root#rcnfsserver start
Your Samba-3 PDC is now ready to communicate with the LDAP password backend. Let's get on with configuration of the LDAP server.
Example 5.6. LDAP Based smb.conf File, Server: MASSIVE global Section: Part A
Example 5.7. LDAP Based smb.conf File, Server: MASSIVE global Section: Part B
The Idealx scripts, or equivalent, are necessary to permit Samba-3 to manage accounts on the LDAP server. You have chosen the Idealx scripts because they are the best-known LDAP configuration scripts. The use of these scripts will help avoid the necessity to create custom scripts. It is easy to download them from the Idealx Web site. The tarball may be directly downloaded from this site also. Alternatively, you may obtain the smbldap-tools-0.9.1-1.src.rpm file that may be used to build an installable RPM package for your Linux system.
Note
The smbldap-tools scripts can be installed in any convenient directory of your choice, in which case you must
change the path to them in your smb.conf file on the PDC (MASSIVE).
The smbldap-tools are located in /opt/IDEALX/sbin.
The scripts are not needed on BDC machines because all LDAP updates are handled by
the PDC alone.
To perform a manual installation of the smbldap-tools scripts, the following procedure may be used:
Procedure 5.5. Unpacking and Installation Steps for the smbldap-tools Tarball
Create the
/opt/IDEALX/sbindirectory, and set its permissions and ownership as shown here:root#mkdir -p /opt/IDEALX/sbinroot#chown root:root /opt/IDEALX/sbinroot#chmod 755 /opt/IDEALX/sbinroot#mkdir -p /etc/smbldap-toolsroot#chown root:root /etc/smbldap-toolsroot#chmod 755 /etc/smbldap-toolsIf you wish to use the downloaded tarball, unpack the smbldap-tools in a suitable temporary location. Change into either the directory extracted from the tarball or the smbldap-tools directory in your
/usr/share/doc/packagesdirectory tree.Copy all the
smbldap-*and theconfigure.plfiles into the/opt/IDEALX/sbindirectory, as shown here:root#cd smbldap-tools-0.9.1/root#cp smbldap-* configure.pl *pm /opt/IDEALX/sbin/root#cp smbldap*conf /etc/smbldap-tools/root#chmod 750 /opt/IDEALX/sbin/smbldap-*root#chmod 750 /opt/IDEALX/sbin/configure.plroot#chmod 640 /etc/smbldap-tools/smbldap.confroot#chmod 600 /etc/smbldap-tools/smbldap_bind.confThe smbldap-tools scripts master control file must now be configured. Change to the
/opt/IDEALX/sbindirectory, then edit thesmbldap_tools.pmto affect the changes shown here:... # ugly funcs using global variables and spawning openldap clients my $smbldap_conf="/etc/smbldap-tools/smbldap.conf"; my $smbldap_bind_conf="/etc/smbldap-tools/smbldap_bind.conf"; ...
To complete the configuration of the smbldap-tools, set the permissions and ownership by executing the following commands:
root#chown root:root /opt/IDEALX/sbin/*root#chmod 755 /opt/IDEALX/sbin/smbldap-*root#chmod 640 /opt/IDEALX/sbin/smb*pmThe smbldap-tools scripts are now ready for the configuration step outlined in “Configuration of smbldap-tools”.
In the event that you have elected to use the RPM package provided by Idealx, download the
source RPM smbldap-tools-0.9.1-1.src.rpm, then follow this procedure:
Procedure 5.6. Installation Steps for smbldap-tools RPM's
Install the source RPM that has been downloaded as follows:
root#rpm -i smbldap-tools-0.9.1-1.src.rpmChange into the directory in which the SPEC files are located. On SUSE Linux:
root#cd /usr/src/packages/SPECSOn Red Hat Linux systems:
root#cd /usr/src/redhat/SPECSEdit the
smbldap-tools.specfile to change the value of the_sysconfigmacro as shown here:%define _prefix /opt/IDEALX %define _sysconfdir /etc
Note: Any suitable directory can be specified.
Build the package by executing:
root#rpmbuild -ba -v smbldap-tools.specA build process that has completed without error will place the installable binary files in the directory
../RPMS/noarch.Install the binary package by executing:
root#rpm -Uvh ../RPMS/noarch/smbldap-tools-0.9.1-1.noarch.rpm
The Idealx scripts should now be ready for configuration using the steps outlined in Configuration of smbldap-tools.
Prior to use, the smbldap-tools must be configured to match the settings in the smb.conf file
and to match the settings in the /etc/openldap/slapd.conf file. The assumption
is made that the smb.conf file has correct contents. The following procedure ensures that
this is completed correctly:
The smbldap-tools require that the NetBIOS name (machine name) of the Samba server be included
in the smb.conf file.
Procedure 5.7. Configuration Steps for smbldap-tools to Enable Use
Change into the directory that contains the
configure.plscript.root#cd /opt/IDEALX/sbinExecute the
configure.plscript as follows:root#./configure.plThe interactive use of this script for the PDC is demonstrated here:
root#/opt/IDEALX/sbin/configure.pl -=-=-=-=-=-=-=-=-=-=-=-=-=-=-=-=-=-=-=-=-=-=-=-=-=-=-=-=-=-=-=-=-=-=-= smbldap-tools script configuration -=-=-=-=-=-=-=-=-=-=-=-=-=-=-=-=-= Before starting, check . if your samba controller is up and running. . if the domain SID is defined (you can get it with the 'net getlocalsid') . you can leave the configuration using the Crtl-c key combination . empty value can be set with the "." character -=-=-=-=-=-=-=-=-=-=-=-=-=-=-=-=-=-=-=-=-=-=-=-=-=-=-=-=-=-=-=-=-=-=-= Looking for configuration files... Samba Config File Location [/etc/samba/smb.conf] > smbldap-tools configuration file Location (global parameters) [/etc/opt/IDEALX/smbldap-tools/smbldap.conf] > smbldap Config file Location (bind parameters) [/etc/opt/IDEALX/smbldap-tools/smbldap_bind.conf] > -=-=-=-=-=-=-=-=-=-=-=-=-=-=-=-=-=-=-=-=-=-=-=-=-=-=-=-=-=-=-=-=-=-= Let's start configuring the smbldap-tools scripts ... . workgroup name: name of the domain Samba act as a PDC workgroup name [MEGANET2] > . netbios name: netbios name of the samba controler netbios name [MASSIVE] > . logon drive: local path to which the home directory will be connected (for NT Workstations). Ex: 'H:' logon drive [H:] > . logon home: home directory location (for Win95/98 or NT Workstation) (use %U as username) Ex:'\\MASSIVE\%U' logon home (press the "." character if you don't want homeDirectory) [\\MASSIVE\%U] > . logon path: directory where roaming profiles are stored. Ex:'\\MASSIVE\profiles\%U' logon path (press the "." character if you don't want roaming profile) [\\%L\profiles\%U] > . home directory prefix (use %U as username) [/home/%U] > /data/users/%U . default users' homeDirectory mode [700] > . default user netlogon script (use %U as username) [scripts\logon.bat] > default password validation time (time in days) [45] > 900 . ldap suffix [dc=abmas,dc=biz] > . ldap group suffix [ou=Groups] > . ldap user suffix [ou=People,ou=Users] > . ldap machine suffix [ou=Computers,ou=Users] > . Idmap suffix [ou=Idmap] > . sambaUnixIdPooldn: object where you want to store the next uidNumber and gidNumber available for new users and groups sambaUnixIdPooldn object (relative to ${suffix}) [sambaDomainName=MEGANET2] > . ldap master server: IP adress or DNS name of the master (writable) ldap server ldap master server [massive.abmas.biz] > . ldap master port [389] > . ldap master bind dn [cn=Manager,dc=abmas,dc=biz] > . ldap master bind password [] > . ldap slave server: IP adress or DNS name of the slave ldap server: can also be the master one ldap slave server [massive.abmas.biz] > . ldap slave port [389] > . ldap slave bind dn [cn=Manager,dc=abmas,dc=biz] > . ldap slave bind password [] > . ldap tls support (1/0) [0] > . SID for domain MEGANET2: SID of the domain (can be obtained with 'net getlocalsid MASSIVE') SID for domain MEGANET2 [S-1-5-21-3504140859-1010554828-2431957765]] > . unix password encryption: encryption used for unix passwords unix password encryption (CRYPT, MD5, SMD5, SSHA, SHA) [SSHA] > MD5 . default user gidNumber [513] > . default computer gidNumber [515] > . default login shell [/bin/bash] > . default skeleton directory [/etc/skel] > . default domain name to append to mail adress [] > abmas.biz -=-=-=-=-=-=-=-=-=-=-=-=-=-=-=-=-=-=-=-=-=-=-=-=-=-=-=-=-=-=-=-=-=-= backup old configuration files: /etc/opt/IDEALX/smbldap-tools/smbldap.conf-> /etc/opt/IDEALX/smbldap-tools/smbldap.conf.old /etc/opt/IDEALX/smbldap-tools/smbldap_bind.conf-> /etc/opt/IDEALX/smbldap-tools/smbldap_bind.conf.old writing new configuration file: /etc/opt/IDEALX/smbldap-tools/smbldap.conf done. /etc/opt/IDEALX/smbldap-tools/smbldap_bind.conf done.Since a slave LDAP server has not been configured, it is necessary to specify the IP address of the master LDAP server for both the master and the slave configuration prompts.
Change to the directory that contains the
smbldap.conffile, then verify its contents.
The smbldap-tools are now ready for use.
The LDAP database must be populated with well-known Windows domain user accounts and domain group accounts before Samba can be used. The following procedures step you through the process.
At this time, Samba-3 requires that on a PDC all UNIX (POSIX) group accounts that are mapped (linked) to Windows domain group accounts must be in the LDAP database. It does not hurt to have UNIX user and group accounts in both the system files as well as in the LDAP database. From a UNIX system perspective, the NSS resolver checks system files before referring to LDAP. If the UNIX system can resolve (find) an account in the system file, it does not need to ask LDAP.
Addition of an account to the LDAP backend can be done in two ways:
If you always have a user account in the
/etc/passwdon every server or in a NIS(+) backend, it is not necessary to add POSIX accounts for them in LDAP. In this case, you can add Windows domain user accounts using thepdbeditutility. Use of this tool from the command line adds the SambaSamAccount entry for the user, but does not add the PosixAccount entry for the user.This is the least desirable method because when LDAP is used as the passwd backend Samba expects the POSIX account to be in LDAP also. It is possible to use the PADL account migration tool to migrate all system accounts from either the
/etc/passwdfiles, or from NIS, to LDAP.If you decide that it is probably a good idea to add both the PosixAccount attributes as well as the SambaSamAccount attributes for each user, then a suitable script is needed. In the example system you are installing in this exercise, you are making use of the Idealx smbldap-tools scripts. A copy of these tools, preconfigured for this system, is included on the enclosed CD-ROM under
Chap06/Tools.
If you wish to have more control over how the LDAP database is initialized or if you don't want to use the Idealx smbldap-tools, you should refer to “A Collection of Useful Tidbits”, “Alternative LDAP Database Initialization”.
The following steps initialize the LDAP database, and then you can add user and group
accounts that Samba can use. You use the smbldap-populate to
seed the LDAP database. You then manually add the accounts shown in “Abmas Network Users and Groups”.
The list of users does not cover all 500 network users; it provides examples only.
Note
In the following examples, as the LDAP database is initialized, we do create a container
for Computer (machine) accounts. In the Samba-3 smb.conf files, specific use is made
of the People container, not the Computers container, for domain member accounts. This is not a
mistake; it is a deliberate action that is necessitated by the fact that the resolution of
a machine (computer) account to a UID is done via NSS. The only way this can be handled is
using the NSS (/etc/nsswitch.conf) entry for passwd,
which is resolved using the nss_ldap library. The configuration file for
the nss_ldap library is the file /etc/ldap.conf that
provides only one possible LDAP search command that is specified by the entry called
nss_base_passwd. This means that the search path must take into account
the directory structure so that the LDAP search will commence at a level that is above
both the Computers container and the Users (or People) container. If this is done, it is
necessary to use a search that will descend the directory tree so that the machine account
can be found. Alternatively, by placing all machine accounts in the People container, we
are able to sidestep this limitation. This is the simpler solution that has been adopted
in this chapter.
Table 5.3. Abmas Network Users and Groups
| Account Name | Type | ID | Password |
|---|---|---|---|
| Robert Jordan | User | bobj | n3v3r2l8 |
| Stanley Soroka | User | stans | impl13dst4r |
| Christine Roberson | User | chrisr | S9n0nw4ll |
| Mary Vortexis | User | maryv | kw13t0n3 |
| Accounts | Group | Accounts | |
| Finances | Group | Finances | |
| Insurance | Group | PIOps |
Procedure 5.8. LDAP Directory Initialization Steps
Start the LDAP server by executing:
root#rcldap start Starting ldap-server doneChange to the
/opt/IDEALX/sbindirectory.Execute the script that will populate the LDAP database as shown here:
root#./smbldap-populate -a root -k 0 -m 0The expected output from this is:
Using workgroup name from smb.conf: sambaDomainName=MEGANET2
-=-=-=-=-=-=-=-=-=-=-=-=-=-=-=-=-=-=-=-=-=-=-=-=
=> Warning: you must update smbldap.conf configuration file to :
=> sambaUnixIdPooldn parameter must be set
	to "sambaDomainName=MEGANET2,dc=abmas,dc=biz"
-=-=-=-=-=-=-=-=-=-=-=-=-=-=-=-=-=-=-=-=-=-=-=-=
Using builtin directory structure
adding new entry: dc=abmas,dc=biz
adding new entry: ou=People,dc=abmas,dc=biz
adding new entry: ou=Groups,dc=abmas,dc=biz
entry ou=People,dc=abmas,dc=biz already exist.
adding new entry: ou=Idmap,dc=abmas,dc=biz
adding new entry: sambaDomainName=MEGANET2,dc=abmas,dc=biz
adding new entry: uid=root,ou=People,dc=abmas,dc=biz
adding new entry: uid=nobody,ou=People,dc=abmas,dc=biz
adding new entry: cn=Domain Admins,ou=Groups,dc=abmas,dc=biz
adding new entry: cn=Domain Users,ou=Groups,dc=abmas,dc=biz
adding new entry: cn=Domain Guests,ou=Groups,dc=abmas,dc=biz
adding new entry: cn=Domain Computers,ou=Groups,dc=abmas,dc=biz
adding new entry: cn=Administrators,ou=Groups,dc=abmas,dc=biz
adding new entry: cn=Print Operators,ou=Groups,dc=abmas,dc=biz
adding new entry: cn=Backup Operators,ou=Groups,dc=abmas,dc=biz
adding new entry: cn=Replicators,ou=Groups,dc=abmas,dc=biz
Edit the
/etc/smbldap-tools/smbldap.conffile so that the following information is changed from:# Where to store next uidNumber and gidNumber available sambaUnixIdPooldn="cn=NextFreeUnixId,${suffix}"to read, after modification:
# Where to store next uidNumber and gidNumber available
#sambaUnixIdPooldn="cn=NextFreeUnixId,${suffix}"
sambaUnixIdPooldn="sambaDomainName=MEGANET2,dc=abmas,dc=biz"
It is necessary to restart the LDAP server as shown here:
root#rcldap restart Shutting down ldap-server done Starting ldap-server doneSo that we can use a global IDMAP repository, the LDAP directory must have a container object for IDMAP data. There are several ways you can check that your LDAP database is able to receive IDMAP information. One of the simplest is to execute:
root#slapcat | grep -i idmap dn: ou=Idmap,dc=abmas,dc=biz ou: idmapIf the execution of this command does not return IDMAP entries, you need to create an LDIF template file (see “LDIF IDMAP Add-On Load File File: /etc/openldap/idmap.LDIF”). You can add the required entries using the following command:
root#ldapadd -x -D "cn=Manager,dc=abmas,dc=biz" \ -w not24get < /etc/openldap/idmap.LDIFSamba automatically populates this LDAP directory container when it needs to.
It looks like all has gone well, as expected. Let's confirm that this is the case by running a few tests. First we check the contents of the database directly by running
slapcatas follows (the output has been cut down):root#slapcat dn: dc=abmas,dc=biz objectClass: dcObject objectClass: organization dc: abmas o: abmas structuralObjectClass: organization entryUUID: 5ab02bf6-c536-1027-9d29-b1f32350fb43 creatorsName: cn=Manager,dc=abmas,dc=biz createTimestamp: 20031217234200Z entryCSN: 2003121723:42:00Z#0x0001#0#0000 modifiersName: cn=Manager,dc=abmas,dc=biz modifyTimestamp: 20031217234200Z ... dn: cn=Domain Computers,ou=Groups,dc=abmas,dc=biz objectClass: posixGroup objectClass: sambaGroupMapping gidNumber: 553 cn: Domain Computers description: Netbios Domain Computers accounts sambaSID: S-1-5-21-3504140859-1010554828-2431957765-553 sambaGroupType: 2 displayName: Domain Computers structuralObjectClass: posixGroup entryUUID: 5e0a41d8-c536-1027-9d3b-b1f32350fb43 creatorsName: cn=Manager,dc=abmas,dc=biz createTimestamp: 20031217234206Z entryCSN: 2003121723:42:06Z#0x0002#0#0000 modifiersName: cn=Manager,dc=abmas,dc=biz modifyTimestamp: 20031217234206ZThis looks good so far.
The next step is to prove that the LDAP server is running and responds to a search request. Execute the following as shown (output has been cut to save space):
root#ldapsearch -x -b "dc=abmas,dc=biz" "(ObjectClass=*)" # extended LDIF # # LDAPv3 # base <dc=abmas,dc=biz> with scope sub # filter: (ObjectClass=*) # requesting: ALL # # abmas.biz dn: dc=abmas,dc=biz objectClass: dcObject objectClass: organization dc: abmas o: abmas # People, abmas.biz dn: ou=People,dc=abmas,dc=biz objectClass: organizationalUnit ou: People ... # Domain Computers, Groups, abmas.biz dn: cn=Domain Computers,ou=Groups,dc=abmas,dc=biz objectClass: posixGroup objectClass: sambaGroupMapping gidNumber: 553 cn: Domain Computers description: Netbios Domain Computers accounts sambaSID: S-1-5-21-3504140859-1010554828-2431957765-553 sambaGroupType: 2 displayName: Domain Computers # search result search: 2 result: 0 Success # numResponses: 20 # numEntries: 19Good. It is all working just fine.
You must now make certain that the NSS resolver can interrogate LDAP also. Execute the following commands:
root#getent passwd | grep root root:x:998:512:Netbios Domain Administrator:/home:/bin/falseroot#getent group | grep Domain Domain Admins:x:512:root Domain Users:x:513: Domain Guests:x:514: Domain Computers:x:553:This demonstrates that the
nss_ldaplibrary is functioning as it should. If these two steps fail to produce this information, refer to “Avoiding Failures: Solving Problems Before They Happen” for diagnostic procedures that can be followed to isolate the cause of the problem. Proceed to the next step only when the previous steps have been successfully completed.Our database is now ready for the addition of network users. For each user for whom an account must be created, execute the following:
root#./smbldap-useradd -m -ausernameroot#./smbldap-passwdusernameChanging password forusernameNew password : XXXXXXXX Retype new password : XXXXXXXXroot#smbpasswdusernameNew SMB password: XXXXXXXX Retype new SMB password: XXXXXXXXwhere
usernameis the login ID for each user.Now verify that the UNIX (POSIX) accounts can be resolved via NSS by executing the following:
root#getent passwd root:x:0:0:root:/root:/bin/bash bin:x:1:1:bin:/bin:/bin/bash ... root:x:0:512:Netbios Domain Administrator:/home:/bin/false nobody:x:999:514:nobody:/dev/null:/bin/false bobj:x:1000:513:System User:/home/bobj:/bin/bash stans:x:1001:513:System User:/home/stans:/bin/bash chrisr:x:1002:513:System User:/home/chrisr:/bin/bash maryv:x:1003:513:System User:/home/maryv:/bin/bashThis demonstrates that user account resolution via LDAP is working.
This step will determine whether or not identity resolution is working correctly. Do not procede is this step fails, rather find the cause of the failure. The
idcommand may be used to validate your configuration so far, as shown here:root#id chrisr uid=1002(chrisr) gid=513(Domain Users) groups=513(Domain Users)This confirms that the UNIX (POSIX) user account information can be resolved from LDAP by system tools that make a getentpw() system call.
The root account must have UID=0; if not, this means that operations conducted from a Windows client using tools such as the Domain User Manager fails under UNIX because the management of user and group accounts requires that the UID=0. Additionally, it is a good idea to make certain that no matter how root account credentials are resolved, the home directory and shell are valid. You decide to effect this immediately as demonstrated here:
root#cd /opt/IDEALX/sbinroot#./smbldap-usermod -u 0 -d /root -s /bin/bash rootVerify that the changes just made to the
rootaccount were accepted by executing:root#getent passwd | grep root root:x:0:0:root:/root:/bin/bash root:x:0:512:Netbios Domain Administrator:/root:/bin/bashThis demonstrates that the changes were accepted.
Make certain that a home directory has been created for every user by listing the directories in
/homeas follows:root#ls -al /home drwxr-xr-x 8 root root 176 Dec 17 18:50 ./ drwxr-xr-x 21 root root 560 Dec 15 22:19 ../ drwx------ 7 bobj Domain Users 568 Dec 17 01:16 bobj/ drwx------ 7 chrisr Domain Users 568 Dec 17 01:19 chrisr/ drwx------ 7 maryv Domain Users 568 Dec 17 01:27 maryv/ drwx------ 7 stans Domain Users 568 Dec 17 01:43 stans/This is precisely what we want to see.
The final validation step involves making certain that Samba-3 can obtain the user accounts from the LDAP ldapsam passwd backend. Execute the following command as shown:
root#pdbedit -Lv chrisr Unix username: chrisr NT username: chrisr Account Flags: [U ] User SID: S-1-5-21-3504140859-1010554828-2431957765-3004 Primary Group SID: S-1-5-21-3504140859-1010554828-2431957765-513 Full Name: System User Home Directory: \\MASSIVE\homes HomeDir Drive: H: Logon Script: scripts\login.cmd Profile Path: \\MASSIVE\profiles\chrisr Domain: MEGANET2 Account desc: System User Workstations: Munged dial: Logon time: 0 Logoff time: Mon, 18 Jan 2038 20:14:07 GMT Kickoff time: Mon, 18 Jan 2038 20:14:07 GMT Password last set: Wed, 17 Dec 2003 17:17:40 GMT Password can change: Wed, 17 Dec 2003 17:17:40 GMT Password must change: Mon, 18 Jan 2038 20:14:07 GMT Last bad password : 0 Bad password count : 0 Logon hours : FFFFFFFFFFFFFFFFFFFFFFFFFFFFFFFFFFFFFFFFFFThis looks good. Of course, you fully expected that it would all work, didn't you?
Now you add the group accounts that are used on the Abmas network. Execute the following exactly as shown:
root#./smbldap-groupadd -a Accountsroot#./smbldap-groupadd -a Financesroot#./smbldap-groupadd -a PIOpsThe addition of groups does not involve keyboard interaction, so the lack of console output is of no concern.
You really do want to confirm that UNIX group resolution from LDAP is functioning as it should. Let's do this as shown here:
root#getent group ... Domain Admins:x:512:root Domain Users:x:513:bobj,stans,chrisr,maryv Domain Guests:x:514: ... Accounts:x:1000: Finances:x:1001: PIOps:x:1002:The well-known special accounts (Domain Admins, Domain Users, Domain Guests), as well as our own site-specific group accounts, are correctly listed. This is looking good.
The final step we need to validate is that Samba can see all the Windows domain groups and that they are correctly mapped to the respective UNIX group account. To do this, just execute the following command:
root#net groupmap list Domain Admins (S-1-5-21-3504140859-...-2431957765-512) -> Domain Admins Domain Users (S-1-5-21-3504140859-...-2431957765-513) -> Domain Users Domain Guests (S-1-5-21-3504140859-...-2431957765-514) -> Domain Guests ... Accounts (S-1-5-21-3504140859-1010554828-2431957765-3001) -> Accounts Finances (S-1-5-21-3504140859-1010554828-2431957765-3003) -> Finances PIOps (S-1-5-21-3504140859-1010554828-2431957765-3005) -> PIOpsThis is looking good. Congratulations it works! Note that in the above output the lines were shortened by replacing the middle value (1010554828) of the SID with the ellipsis (...).
The server you have so carefully built is now ready for another important step. You start the Samba-3 server and validate its operation. Execute the following to render all the processes needed fully operative so that, on system reboot, they are automatically started:
root#chkconfig named onroot#chkconfig dhcpd onroot#chkconfig ldap onroot#chkconfig nmb onroot#chkconfig smb onroot#chkconfig winbind onroot#rcnmb startroot#rcsmb startroot#rcwinbind startThe next step might seem a little odd at this point, but take note that you are about to start
winbindd, which must be able to authenticate to the PDC via the localhost interface with thesmbdprocess. This account can be easily created by joining the PDC to the domain by executing the following command:root#net rpc join -S MASSIVE -U root%not24getNote: Before executing this command on the PDC, both
nmbdandsmbdmust be started so that thenetcommand can communicate withsmbd. The expected output is as follows:Joined domain MEGANET2.
This indicates that the domain security account for the PDC has been correctly created.
At this time it is necessary to restart
winbinddso that it can correctly authenticate to the PDC. The following command achieves that:root#rcwinbind restartYou may now check Samba-3 operation as follows:
root#smbclient -L massive -U% Sharename Type Comment --------- ---- ------- IPC$ IPC IPC Service (Samba 3.0.20) accounts Disk Accounting Files service Disk Financial Services Files pidata Disk Property Insurance Files apps Disk Application Files netlogon Disk Network Logon Service profiles Disk Profile Share profdata Disk Profile Data Share ADMIN$ IPC IPC Service (Samba 3.0.20) Server Comment --------- ------- MASSIVE Samba 3.0.20 Workgroup Master --------- ------- MEGANET2 MASSIVEThis shows that an anonymous connection is working.
For your finale, let's try an authenticated connection:
root#smbclient //massive/bobj -Ubobj%n3v3r2l8 smb: \> dir . D 0 Wed Dec 17 01:16:19 2003 .. D 0 Wed Dec 17 19:04:42 2003 bin D 0 Tue Sep 2 04:00:57 2003 Documents D 0 Sun Nov 30 07:28:20 2003 public_html D 0 Sun Nov 30 07:28:20 2003 .urlview H 311 Fri Jul 7 06:55:35 2000 .dvipsrc H 208 Fri Nov 17 11:22:02 1995 57681 blocks of size 524288. 57128 blocks available smb: \> qWell done. All is working fine.
The server MASSIVE is now configured, and it is time to move onto the next task.
The configuration for Samba-3 to enable CUPS raw-print-through printing has already been
taken care of in the smb.conf file. The only preparation needed for smart
printing to be possible involves creation of the directories in which Samba-3 stores
Windows printing driver files.
Procedure 5.9. Printer Configuration Steps
Configure all network-attached printers to have a fixed IP address.
Create an entry in the DNS database on the server
MASSIVEin both the forward lookup database for the zoneabmas.biz.hostsand in the reverse lookup database for the network segment that the printer is to be located in. Example configuration files for similar zones were presented in “Secure Office Networking”, “DNS Abmas.biz Forward Zone File” and in “DNS 192.168.2 Reverse Zone File”.Follow the instructions in the printer manufacturers' manuals to permit printing to port 9100. Use any other port the manufacturer specifies for direct mode, raw printing. This allows the CUPS spooler to print using raw mode protocols.
Only on the server to which the printer is attached, configure the CUPS Print Queues as follows:
root#lpadmin -pprintque-v socket://printer-name.abmas.biz:9100 -EThis step creates the necessary print queue to use no assigned print filter. This is ideal for raw printing, that is, printing without use of filters. The name
printqueis the name you have assigned for the particular printer.Print queues may not be enabled at creation. Make certain that the queues you have just created are enabled by executing the following:
root#/usr/bin/enableprintqueEven though your print queue may be enabled, it is still possible that it may not accept print jobs. A print queue will service incoming printing requests only when configured to do so. Ensure that your print queue is set to accept incoming jobs by executing the following commands:
root#/usr/bin/acceptprintqueEdit the file
/etc/cups/mime.convsto uncomment the line:application/octet-stream application/vnd.cups-raw 0 -
Edit the file
/etc/cups/mime.typesto uncomment the line:application/octet-stream
Refer to the CUPS printing manual for instructions regarding how to configure CUPS so that print queues that reside on CUPS servers on remote networks route print jobs to the print server that owns that queue. The default setting on your CUPS server may automatically discover remotely installed printers and may permit this functionality without requiring specific configuration.
The following action creates the necessary directory subsystem. Follow these steps to printing heaven:
root#mkdir -p /var/lib/samba/drivers/{W32ALPHA,W32MIPS,W32X86,WIN40}root#chown -R root:root /var/lib/samba/driversroot#chmod -R ug=rwx,o=rx /var/lib/samba/drivers
Procedure 5.10. Configuration of BDC Called: BLDG1
Install the files in “LDAP Based smb.conf File, Server: BLDG1”, “LDAP Based smb.conf File, Shares Section Part A”, and “LDAP Based smb.conf File, Shares Section Part B” into the
/etc/samba/directory. The three files should be added together to form thesmb.conffile.Verify the
smb.conffile as in step 2 of “Samba-3 PDC Configuration”.Carefully follow the steps outlined in “PAM and NSS Client Configuration”, taking particular note to install the correct
ldap.conf.Verify that the NSS resolver is working. You may need to cycle the run level to 1 and back to 5 before the NSS LDAP resolver functions. Follow these commands:
root#init 1After the run level has been achieved, you are prompted to provide the
rootpassword. Log on, and then execute:root#init 5When the normal logon prompt appears, log into the system as
rootand then execute these commands:root#getent passwd root:x:0:0:root:/root:/bin/bash bin:x:1:1:bin:/bin:/bin/bash daemon:x:2:2:Daemon:/sbin:/bin/bash lp:x:4:7:Printing daemon:/var/spool/lpd:/bin/bash mail:x:8:12:Mailer daemon:/var/spool/clientmqueue:/bin/false ... root:x:0:512:Netbios Domain Administrator:/root:/bin/bash nobody:x:999:514:nobody:/dev/null:/bin/false bobj:x:1000:513:System User:/home/bobj:/bin/bash stans:x:1001:513:System User:/home/stans:/bin/bash chrisr:x:1002:513:System User:/home/chrisr:/bin/bash maryv:x:1003:513:System User:/home/maryv:/bin/bash vaioboss$:x:1005:553:vaioboss$:/dev/null:/bin/false bldg1$:x:1006:553:bldg1$:/dev/null:/bin/falseThis is the correct output. If the accounts that have UIDs above 512 are not shown, there is a problem.
The next step in the verification process involves testing the operation of UNIX group resolution via the NSS LDAP resolver. Execute these commands:
root#getent group root:x:0: bin:x:1:daemon daemon:x:2: sys:x:3: ... Domain Admins:x:512:root Domain Users:x:513:bobj,stans,chrisr,maryv,jht Domain Guests:x:514: Administrators:x:544: Users:x:545: Guests:x:546:nobody Power Users:x:547: Account Operators:x:548: Server Operators:x:549: Print Operators:x:550: Backup Operators:x:551: Replicator:x:552: Domain Computers:x:553: Accounts:x:1000: Finances:x:1001: PIOps:x:1002:This is also the correct and desired output, because it demonstrates that the LDAP client is able to communicate correctly with the LDAP server (
MASSIVE).You must now set the LDAP administrative password into the Samba-3
secrets.tdbfile by executing this command:root#smbpasswd -w not24get Setting stored password for "cn=Manager,dc=abmas,dc=biz" in secrets.tdbNow you must obtain the domain SID from the PDC and store it into the
secrets.tdbfile also. This step is not necessary with an LDAP passdb backend because Samba-3 obtains the domain SID from the sambaDomain object it automatically stores in the LDAP backend. It does not hurt to add the SID to thesecrets.tdb, and if you wish to do so, this command can achieve that:root#net rpc getsid MEGANET2 Storing SID S-1-5-21-3504140859-1010554828-2431957765 \ for Domain MEGANET2 in secrets.tdbWhen configuring a Samba-3 BDC that has an LDAP backend, there is no need to take any special action to join it to the domain. However, winbind communicates with the domain controller that is running on the localhost and must be able to authenticate, thus requiring that the BDC should be joined to the domain. The process of joining the domain creates the necessary authentication accounts.
To join the Samba BDC to the domain, execute the following:
root#net rpc join -U root%not24get Joined domain MEGANET2.This indicates that the domain security account for the BDC has been correctly created.
Verify that user and group account resolution works via Samba-3 tools as follows:
root#pdbedit -L root:0:root nobody:65534:nobody bobj:1000:System User stans:1001:System User chrisr:1002:System User maryv:1003:System User bldg1$:1006:bldg1$root#net groupmap list Domain Admins (S-1-5-21-3504140859-...-2431957765-512) -> Domain Admins Domain Users (S-1-5-21-3504140859-...-2431957765-513) -> Domain Users Domain Guests (S-1-5-21-3504140859-...-2431957765-514) -> Domain Guests Administrators (S-1-5-21-3504140859-...-2431957765-544) -> Administrators ... Accounts (S-1-5-21-3504140859-1010554828-2431957765-3001) -> Accounts Finances (S-1-5-21-3504140859-1010554828-2431957765-3003) -> Finances PIOps (S-1-5-21-3504140859-1010554828-2431957765-3005) -> PIOpsThese results show that all things are in order.
The server you have so carefully built is now ready for another important step. Now start the Samba-3 server and validate its operation. Execute the following to render all the processes needed fully operative so that, upon system reboot, they are automatically started:
root#chkconfig named onroot#chkconfig dhcpd onroot#chkconfig nmb onroot#chkconfig smb onroot#chkconfig winbind onroot#rcnmb startroot#rcsmb startroot#rcwinbind startSamba-3 should now be running and is ready for a quick test. But not quite yet!
Your new
BLDG1, BLDG2servers do not have home directories for users. To rectify this using the SUSE yast2 utility or by manually editing the/etc/fstabfile, add a mount entry to mount thehomedirectory that has been exported from theMASSIVEserver. Mount this resource before proceeding. An alternate approach could be to create local home directories for users who are to use these machines. This is a choice that you, as system administrator, must make. The following entry in the/etc/fstabfile suffices for now:massive.abmas.biz:/home /home nfs rw 0 0
To mount this resource, execute:
root#mount -aVerify that the home directory has been mounted as follows:
root#df | grep home massive:/home 29532988 283388 29249600 1% /homeImplement a quick check using one of the users that is in the LDAP database. Here you go:
root#smbclient //bldg1/bobj -Ubobj%n3v3r2l8 smb: \> dir . D 0 Wed Dec 17 01:16:19 2003 .. D 0 Wed Dec 17 19:04:42 2003 bin D 0 Tue Sep 2 04:00:57 2003 Documents D 0 Sun Nov 30 07:28:20 2003 public_html D 0 Sun Nov 30 07:28:20 2003 .urlview H 311 Fri Jul 7 06:55:35 2000 .dvipsrc H 208 Fri Nov 17 11:22:02 1995 57681 blocks of size 524288. 57128 blocks available smb: \> q
Now that the first BDC (BDLG1) has been configured it is time to build
and configure the second BDC server (BLDG2) as follows:
Procedure 5.11. Configuration of BDC Called BLDG2
Install the files in “LDAP Based smb.conf File, Server: BLDG2”, “LDAP Based smb.conf File, Shares Section Part A”, and “LDAP Based smb.conf File, Shares Section Part B” into the
/etc/samba/directory. The three files should be added together to form thesmb.conffile.Follow carefully the steps shown in “Samba-3 BDC Configuration”, starting at step 2.
Example 5.8. LDAP Based smb.conf File, Server: BLDG1
Example 5.9. LDAP Based smb.conf File, Server: BLDG2
Example 5.10. LDAP Based smb.conf File, Shares Section Part A
Example 5.11. LDAP Based smb.conf File, Shares Section Part B
Example 5.12. LDIF IDMAP Add-On Load File File: /etc/openldap/idmap.LDIF
dn: ou=Idmap,dc=abmas,dc=biz
objectClass: organizationalUnit
ou: idmap
structuralObjectClass: organizationalUnit
My father would say, “Dinner is not over until the dishes have been done.” The makings of a great network environment take a lot of effort and attention to detail. So far, you have completed most of the complex (and to many administrators, the interesting part of server configuration) steps, but remember to tie it all together. Here are a few more steps that must be completed so that your network runs like a well-rehearsed orchestra.
In your smb.conf file, you have specified Windows shares. Each has a path
parameter. Even though it is obvious to all, one of the common Samba networking problems is
caused by forgetting to verify that every such share root directory actually exists and that it
has the necessary permissions and ownership.
Here is an example, but remember to create the directory needed for every share:
root#mkdir -p /data/{accounts,finsvcs,piops}root#mkdir -p /appsroot#chown -R root:root /dataroot#chown -R root:root /appsroot#chown -R bobj:Accounts /data/accountsroot#chown -R bobj:Finances /data/finsvcsroot#chown -R bobj:PIOps /data/piopsroot#chmod -R ug+rwxs,o-rwx /dataroot#chmod -R ug+rwx,o+rx-w /apps
You made a conscious decision to do everything it would take to improve network client performance. One of your decisions was to implement folder redirection. This means that Windows user desktop profiles are now made up of two components: a dynamically loaded part and a set of file network folders.
For this arrangement to work, every user needs a directory structure for the network folder portion of his or her profile as shown here:
root#mkdir -p /var/lib/samba/profdataroot#chown root:root /var/lib/samba/profdataroot#chmod 755 /var/lib/samba/profdata # Per user structureroot#cd /var/lib/samba/profdataroot#mkdir -p usernameroot#for i in InternetFiles Cookies History AppData \ LocalSettings MyPictures MyDocuments Recentroot#doroot#mkdir username/$iroot#doneroot#chown -R username:Domain\ Users usernameroot#chmod -R 750 username
You have three options insofar as the dynamically loaded portion of the roaming profile is concerned:
You may permit the user to obtain a default profile.
You can create a mandatory profile.
You can create a group profile (which is almost always a mandatory profile).
Mandatory profiles cannot be overwritten by a user. The change from a user profile to a mandatory
profile is effected by renaming the NTUSER.DAT to NTUSER.MAN,
that is, just by changing the filename extension.
The location of the profile that a user can obtain is set in the user's account in the LDAP passdb backend. You can manage this using the Idealx smbldap-tools or using the Windows NT4 Domain User Manager.
It may not be obvious that you must ensure that the root directory for the user's profile exists and has the needed permissions. Use the following commands to create this directory:
root#mkdir -p /var/lib/samba/profiles/usernameroot#chown username:Domain\ Users /var/lib/samba/profiles/usernameroot#chmod 700 /var/lib/samba/profiles/username
The use of a logon script with Windows XP Professional is an option that every site should consider. Unless you have locked down the desktop so the user cannot change anything, there is risk that a vital network drive setting may be broken or that printer connections may be lost. Logon scripts can help to restore persistent network folder (drive) and printer connections in a predictable manner. One situation in which such breakage may occur in particular is when a mobile PC (notebook) user attaches to another company's network that forces environment changes that are alien to your network.
If you decide to use network logon scripts, by reference to the smb.conf files for the domain
controllers, you see that the path to the share point for the NETLOGON
share defined is /var/lib/samba/netlogon. The path defined for the logon
script inside that share is scripts\logon.bat. This means that as a Windows
NT/200x/XP client logs onto the network, it tries to obtain the file logon.bat
from the fully qualified path /var/lib/samba/netlogon/scripts. This fully
qualified path should therefore exist whether you install the logon.bat.
You can, of course, create the fully qualified path by executing:
root# mkdir -p /var/lib/samba/netlogon/scripts
You should research the options for logon script implementation by referring to TOSHARG2, Chapter 24, Section 24.4. A quick Web search will bring up a host of options. One of the most popular logon facilities in use today is called KiXtart.
The ability to perform tasks such as joining Windows clients to the domain can be assigned to
normal user accounts. By default, only the domain administrator account (root on UNIX
systems because it has UID=0) can add accounts. New to Samba 3.0.11 is the ability to grant
this privilege in a very limited fashion to particular accounts.
By default, even Samba-3.0.11 does not grant any rights even to the Domain Admins
group. Here we grant this group all privileges.
Samba limits privileges on a per-server basis. This is a deliberate limitation so that users who are granted rights can be restricted to particular machines. It is left to the network administrator to determine which rights should be provided and to whom.
Procedure 5.12. Steps for Assignment of User Rights and Privileges
Log onto the PDC as the
rootaccount.Execute the following command to grant the
Domain Adminsgroup all rights and privileges:root#net -S MASSIVE -U root%not24get rpc rights grant \ "MEGANET2\Domain Admins" SeMachineAccountPrivilege \ SePrintOperatorPrivilege SeAddUsersPrivilege \ SeDiskOperatorPrivilege SeRemoteShutdownPrivilege Successfully granted rights.Repeat this step on each domain controller, in each case substituting the name of the server (e.g., BLDG1, BLDG2) in place of the PDC called MASSIVE.
In this step the privilege will be granted to Bob Jordan (bobj) to add Windows workstations to the domain. Execute the following only on the PDC. It is not necessary to do this on BDCs or on DMS machines because machine accounts are only ever added by the PDC:
root#net -S MASSIVE -U root%not24get rpc rights grant \ "MEGANET2\bobj" SeMachineAccountPrivilege Successfully granted rights.Verify that privilege assignments have been correctly applied by executing:
net rpc rights list accounts -Uroot%not24get
MEGANET2\bobj
SeMachineAccountPrivilege

S-0-0
No privileges assigned

BUILTIN\Print Operators
No privileges assigned

BUILTIN\Account Operators
No privileges assigned

BUILTIN\Backup Operators
No privileges assigned

BUILTIN\Server Operators
No privileges assigned

BUILTIN\Administrators
No privileges assigned

Everyone
No privileges assigned

MEGANET2\Domain Admins
SeMachineAccountPrivilege
SePrintOperatorPrivilege
SeAddUsersPrivilege
SeRemoteShutdownPrivilege
SeDiskOperatorPrivilege
In the next few sections, you can configure a new Windows XP Professional disk image on a staging
machine. You will configure all software, printer settings, profile and policy handling, and desktop
default profile settings on this system. When it is complete, you copy the contents of the
C:\Documents and Settings\Default User directory to a directory with the same
name in the NETLOGON share on the domain controllers.
Much can be learned from the Microsoft Support site regarding how best to set up shared profiles. One knowledge-base article in particular stands out: "How to Create a Base Profile for All Users."
Log onto the Windows XP Professional workstation as the local Administrator.
It is necessary to expose folders that are generally hidden to provide access to the
Default User folder.
Procedure 5.14. Redirect Folders in Default System User Profile
Give focus to
HKEY_LOCAL_MACHINEhive entry in the left panel. Click → → → → → . In the dialog box that opens, enter the key nameDefaultand click .Browse inside the newly loaded Default folder to:
HKEY_LOCAL_MACHINE\Default\Software\Microsoft\Windows\
                     CurrentVersion\Explorer\User Shell Folders\
The right panel reveals the contents as shown in “Windows XP Professional User Shared Folders”.
You edit hive keys. Acceptable values to replace the
%USERPROFILE%variable includes:A drive letter such as
U:A direct network path such as
\\MASSIVE\profdataA network redirection (UNC name) that contains a macro such as
%LOGONSERVER%\profdata\
Set the registry keys as shown in “Default Profile Redirections”. Your implementation makes the assumption that users have statically located machines. Notebook computers (mobile users) need to be accommodated using local profiles. This is not an uncommon assumption.
Click back to the root of the loaded hive
Default. Click → → .Now follow the procedure given in “The Local Group Policy”. Make sure that each folder you have redirected is in the exclusion list.
You are now ready to copy[11] the Default User profile to the Samba domain controllers. Launch Microsoft Windows Explorer, and use it to copy the full contents of the directory
Default Userthat is in theC:\Documents and Settingsto the root directory of theNETLOGONshare. If theNETLOGONshare has the defined UNIX path of/var/lib/samba/netlogon, when the copy is complete there must be a directory in there calledDefault User.
Before punching out new desktop images for the client workstations, it is perhaps a good idea that desktop behavior should be returned to the original Microsoft settings. The following steps achieve that ojective:
Procedure 5.15. Reset Folder Display to Original Behavior
To launch the Windows Explorer, click → → → → . Deselect Show hidden files and folders, and click . Exit Windows Explorer.
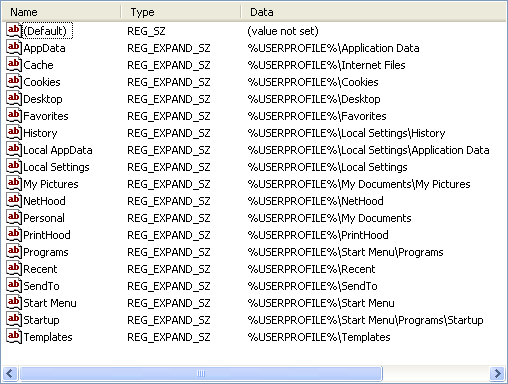
Table 5.4. Default Profile Redirections
| Registry Key | Redirected Value |
|---|---|
| Cache | %LOGONSERVER%\profdata\%USERNAME%\InternetFiles |
| Cookies | %LOGONSERVER%\profdata\%USERNAME%\Cookies |
| History | %LOGONSERVER%\profdata\%USERNAME%\History |
| Local AppData | %LOGONSERVER%\profdata\%USERNAME%\AppData |
| Local Settings | %LOGONSERVER%\profdata\%USERNAME%\LocalSettings |
| My Pictures | %LOGONSERVER%\profdata\%USERNAME%\MyPictures |
| Personal | %LOGONSERVER%\profdata\%USERNAME%\MyDocuments |
| Recent | %LOGONSERVER%\profdata\%USERNAME%\Recent |
Microsoft Outlook can store a Personal Storage file, generally known as a PST file. It is the nature of email storage that this file grows, at times quite rapidly. So that users' email is available to them at every workstation they may log onto, it is common practice in well-controlled sites to redirect the PST folder to the users' home directory. Follow these steps for each user who wishes to do this.
To redirect the Outlook PST file in Outlook 2003 (older versions of Outlook behave slightly differently), follow these steps:
Procedure 5.16. Outlook PST File Relocation
Close Outlook if it is open.
From the , launch the Mail icon.
Click
Make a note of the location of the PST file(s). From this location, move the files to the desired new target location. The most desired new target location may well be the users' home directory.
Add a new data file, selecting the PST file in the new desired target location. Give this entry (not the filename) a new name such as “Personal Mail Folders.”
Note: If MS Outlook has been configured to use an IMAP account configuration there may be problems following these instructions. Feedback from users suggests that where IMAP is used the PST file is used to store rules and filters. When the PST store is relocated it appears to break MS Outlook's Send/Receive button. If anyone has sucessfully relocated PST files where IMAP is used please email
jht@samba.orgwith useful tips and suggestions so that this warning can be removed or modified.Close the windows, then click .
Select exiting email accounts, click
Change the so as to use the data file in the new target location.
Go back to the window, then delete the old data file entry.
Note
You may have to remove and reinstall the Outlook Address Book (Contacts) entries, otherwise the user may be not be able to retrieve contacts when addressing a new email message.
Note
Outlook Express is not at all like MS OutLook. It stores file very differently also. Outlook Express storage files can not be redirected to network shares. The options panel will not permit this, but they can be moved to folders outside of the user's profile. They can also be excluded from folder synchronization as part of the roaming profile.
While it is possible to redirect the data stores for Outlook Express data stores by editing the registry, experience has shown that data corruption and loss of email messages will result.
In the same vane as MS Outlook, Outlook Express data stores can become very large. When used with roaming profiles this can result in excruciatingly long login and logout behavior will files are synchronized. For this reason, it is highly recommended not to use Outlook Express where roaming profiles are used.
Microsoft does not support storing PST files on network shares, although the practice does appear to be rather popular. Anyone who does relocation the PST file to a network resource should refer the Microsoft reference to better understand the issues.
Apart from manually moving PST files to a network share, it is possible to set the default PST location for new accounts by following the instructions at the WindowsITPro web site.
User feedback suggests that disabling of oplocks on PST files will significantly improve
network performance by reducing locking overheads. One way this can be done is to add to the
smb.conf file stanza for the share the PST file the following:
veto oplock files = /*.pdf/*.PST/
Configure the Windows XP Professional client to auto-delete roaming profiles on logout:
Click
→ . In the dialog box, enter MMC and click .
Follow these steps to set the default behavior of the staging machine so that all roaming profiles are deleted as network users log out of the system. Click → → → → → → → .
The Microsoft Management Console now shows the utility that enables you to set the policies needed. In the left panel, click → → → . In the right panel, set the properties shown here by double-clicking on each item as shown:
Do not check for user ownership of Roaming Profile Folders = Enabled
Delete cached copies of roaming profiles = Enabled
Close the Microsoft Management Console. The settings take immediate effect and persist onto all image copies made of this system to deploy the new standard desktop system.
Users want to be able to use network printers. You have a vested interest in making it easy for them to print. You have chosen to install the printer drivers onto the Samba servers and to enable point-and-click (drag-and-drop) printing. This process results in Samba being able to automatically provide the Windows client with the driver necessary to print to the printer chosen. The following procedure must be followed for every network printer:
Procedure 5.17. Steps to Install Printer Drivers on the Samba Servers
Join your Windows XP Professional workstation (the staging machine) to the
MEGANET2domain. If you are not sure of the procedure, follow the guidance given in “A Collection of Useful Tidbits”, “Joining a Domain: Windows 200x/XP Professional”.After the machine has rebooted, log onto the workstation as the domain
root(this is the Administrator account for the operating system that is the host platform for this implementation of Samba.Launch MS Windows Explorer. Navigate in the left panel. Click → → → → . Click on .
Identify a printer that is shown in the right panel. Let us assume the printer is called
ps01-color. Right-click on the icon and select the entry. This opens a dialog box that indicates that “The printer driver is not installed on this computer. Some printer properties will not be accessible unless you install the printer driver. Do you want to install the driver now?” It is important at this point you answer .The printer properties panel for the printer on the server
MASSIVEis displayed. Click the tab. Note that the box labeled is empty. Click the button that is next to the box. This launches the “Add Printer Wizard”.The “Add Printer Driver Wizard on
MASSIVE” panel is now presented. Click to continue. From the left panel, select the printer manufacturer. In your case, you are adding a driver for a printer manufactured by Lexmark. In the right panel, select the printer (Lexmark Optra Color 40 PS). Click , and then to commence driver upload. A progress bar appears and instructs you as each file is being uploaded and that it is being directed at the network server\\massive\ps01-color.The driver upload completes in anywhere from a few seconds to a few minutes. When it completes, you are returned to the tab in the panel. You can set the Location (under the tab) and Security settings (under the tab). Under the tab it is possible to load additional printer drivers; there is also a check-box in this tab called “List in the directory”. When this box is checked, the printer will be published in Active Directory (Applicable to Active Directory use only.)
Click . It will take a minute or so to upload the settings to the server. You are now returned to the monitor. Right-click on the printer, click → . Now change the settings to suit your requirements. BE CERTAIN TO CHANGE AT LEAST ONE SETTING and apply the changes even if you need to reverse the changes back to their original settings.
This is necessary so that the printer settings are initialized in the Samba printers database. Click to commit your settings. Revert any settings you changed just to initialize the Samba printers database entry for this printer. If you need to revert a setting, click again.
Verify that all printer settings are at the desired configuration. When you are satisfied that they are, click the tab. Now click the button. A test page should print. Verify that it has printed correctly. Then click in the panel that is newly presented. Click on the panel.
You must repeat this process for all network printers (i.e., for every printer on each server). When you have finished uploading drivers to all printers, close all applications. The next task is to install software your users require to do their work.
Your network has both fixed desktop workstations as well as notebook computers. As a general rule, it is a good idea to not tamper with the operating system that is provided by the notebook computer manufacturer. Notebooks require special handling that is beyond the scope of this chapter.
For desktop systems, the installation of software onto administratively centralized application servers make a lot of sense. This means that you can manage software maintenance from a central perspective and that only minimal application stubware needs to be installed onto the desktop systems. You should proceed with software installation and default configuration as far as is humanly possible and so long as it makes sense to do so. Make certain to thoroughly test and validate every aspect of software operations and configuration.
When you believe that the overall configuration is complete, be sure to create a shared group profile and migrate that to the Samba server for later reuse when creating custom mandatory profiles, just in case a user may have specific needs you had not anticipated.
The final steps before preparing the distribution Norton Ghost image file you might follow are:
Unjoin the domain Each workstation requires a unique name and must be independently joined into domain membership.
Defragment the hard disk While not obvious to the uninitiated, defragmentation results in better performance and often significantly reduces the size of the compressed disk image. That also means it will take less time to deploy the image onto 500 workstations.
This chapter introduced many new concepts. Is it a sad fact that the example presented deliberately avoided any consideration of security. Security does not just happen; you must design it into your total network. Security begins with a systems design and implementation that anticipates hostile behavior from users both inside and outside the organization. Hostile and malicious intruders do not respect barriers; they accept them as challenges. For that reason, if not simply from a desire to establish safe networking practices, you must not deploy the design presented in this book in an environment where there is risk of compromise.
As a minimum, the LDAP server must be protected by way of Access Control Lists (ACLs), and it must be configured to use secure protocols for all communications over the network. Of course, secure networking does not result just from systems design and implementation but involves constant user education training and, above all, disciplined attention to detail and constant searching for signs of unfriendly or alien activities. Security is itself a topic for a whole book. Please do consult appropriate sources. Jerry Carter's book LDAP System Administration is a good place to start reading about OpenLDAP as well as security considerations.
The substance of this chapter that has been deserving of particular attention includes:
Implementation of an OpenLDAP-based passwd backend, necessary to support distributed domain control.
Implementation of Samba primary and secondary domain controllers with a common LDAP backend for user and group accounts that is shared with the UNIX system through the PADL nss_ldap and pam_ldap tool-sets.
Use of the Idealx smbldap-tools scripts for UNIX (POSIX) account management as well as to manage Samba Windows user and group accounts.
The basics of implementation of Group Policy controls for Windows network clients.
Control over roaming profiles, with particular focus on folder redirection to network drives.
Use of the CUPS printing system together with Samba-based printer driver auto-download.
Well, here we are at the end of this chapter and we have only ten questions to help you to remember so much. There are bound to be some sticky issues here.
- Why did you not cover secure practices? Isn't it rather irresponsible to instruct network administrators to implement insecure solutions?
- You have focused much on SUSE Linux and little on the market leader, Red Hat. Do you have a problem with Red Hat Linux? Doesn't that make your guidance irrelevant to the Linux I might be using?
- You did not use SWAT to configure Samba. Is there something wrong with it?
- You have exposed a well-used password not24get. Is that not irresponsible?
- The Idealx smbldap-tools create many domain group accounts that are not used. Is that a good thing?
- Can I use LDAP just for Samba accounts and not for UNIX system accounts?
- Why are the Windows domain RID portions not the same as the UNIX UID?
- Printer configuration examples all show printing to the HP port 9100. Does this mean that I must have HP printers for these solutions to work?
- Is folder redirection dangerous? I've heard that you can lose your data that way.
- Is it really necessary to set a local Group Policy to exclude the redirected folders from the roaming profile?
[11]
There is an alternate method by which a default user profile can be added to the
NETLOGON share. This facility in the Windows System tool
permits profiles to be exported. The export target may be a particular user or
group profile share point or else the NETLOGON share.
In this case, the profile directory must be named Default User.